INFO PAGE
Neighborhood Block Party Site Plan Examples
Use examples from this page to create a site plan for your neighborhood block party.
Site plan guidelines
If you would like to put items in the street - small pop-up tents, cornhole sets, a bounce house - that extend where traffic might go, then you need a site plan. You can draw a site plan by hand or on a computer. Make sure it shows everything you want to place on the street, to scale.
- Leave a 14 foot wide emergency traffic lane free of all items
- Leave space at the end of each block 20 feet from crosswalks clear of event items
- Leave space in front of neighbors' driveways clear unless they agree to having their driveways blocked
- Include measurements for the street width
- Show any features of the street, like traffic islands, fire hydrants
- Mark driveways – you need to leave these clear so that your neighbors can get in and out of their garages
- Note where you’ll put everything, like tents, bounce house, tables. Write down the dimensions.
- For tables and chairs, you can just show the area where they’ll be, rather than each individual item.
- 10x10 pop-ups are allowed, if they fit. These are small booths that have a ceiling only, no walls.
- Note where you will place barricades
We recommend having the lane run down the center of the road, not on the side, as this avoids the need for “no parking” signs and, potentially, towing.
People can be in the emergency lane during the event, just not objects like tents, or tables/chairs.
Example 1
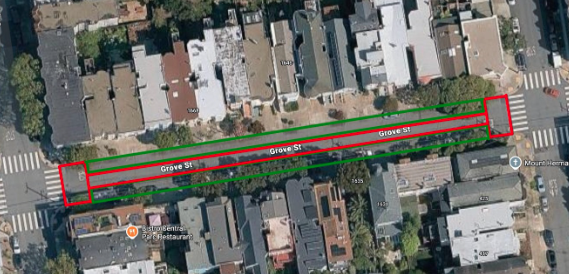
For a standard residential street with parking on both sides and two traffic lanes, organizers could:
- Place objects on one side of the street for your event in the space where cars typically park (marked in green, up to 14 feet from the curb)
- Leaving an adequate 14 foot emergency lane without requiring 'no parking' signs on the other side of the street
- Leave 20 feet before intersections at both ends of the block empty (marked in red)
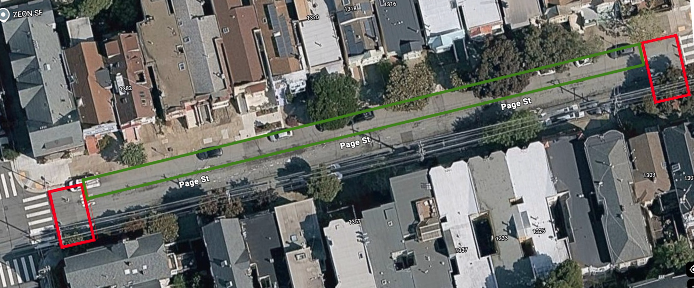
Example 2
For a standard residential street with parking on both sides and two traffic lanes, event organizers could:
- Place objects on one side of the street for your event in the space where cars typically park (marked in green, up to 12 feet from the curb) on both sides of the street
- Leave a 14 foot center lane for emergency access (marked as a long red strip)
- Leave 20 feet before intersections at both ends of the block empty (marked as red squares)
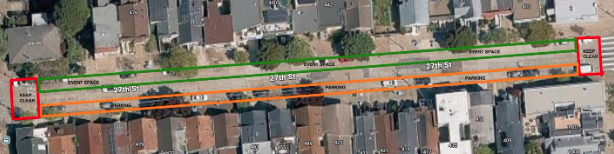
Example 3
For a narrow residential street with parking on both sides and two traffic lanes without street markers, event organizers could:
- Place objects up to 12 feet from the curb on one side (marked in green)
- Leave a 14 foot emergency lane down the center,
- Leave 8 feet for parking on the other side (marked in orange)
- Leave 20 feet before intersections at both ends of the block empty (marked as red squares).